At Hippo we recently started using Couchbase as the storage solution for our targeting/relevance module. Couchbase is a really high performant NoSQL database, which since version 2.0 can be used as a (JSON) document database. Couchbase is really fast when it comes to simple CRUD operations, but does lack some search capabilities like Geo-spatial search (still ‘experimental’ mode) and free text search, which you might find in other document oriented NoSQL databases like MongoDB.
However the lack of these search capabilities can be overcome quite easily by combining Couchbase with Elasticsearch by using the Couchbase-Elasticsearch transport plugin. The plugin uses the Couchbase built-in cross data center replication mechanism (XDCR), which can be used for replicating data between Couchbase clusters. It sort of makes Elasticsearch act just like another Couchbase cluster.
In this post we will go through all the necessary steps to setup Couchbase, Elasticsearch and Kibana for doing ‘real-time’ visitor analysis.
If you are familiar with LogStash you might wonder why we use Couchbase as an additional storage for our request data. Well it’s because with Hippo CMS we store more than just the request log information. We also store information about a visitor over multiple requests with regards to (content) characteristics and persona based matching. We need a cluster-wide high performance database for that and that’s why we use Couchbase as a first layer of storage.
Setting up Couchbase
As I’ve said before at Hippo we use Couchbase as our storage solution. For installation instructions please see the official Couchbase download page. Couchbase uses data buckets for storage. There are two kind of buckets available; ‘couchbase’ buckets and ‘memcached’ buckets. For this specific use-case you will need to create a bucket of type ‘couchbase’ called ‘targeting’. Buckets of type ‘couchbase’ allow you to store JSON documents and perform for instance map-reduce functions on the available data in a bucket.

In this bucket we will be storing request data. An example of a request document could look similar to this:
{
  "visitorId": "7a1c7e75-8539-40",
  "pageUrl": "http://www.mydomain.com/news",
  "pathInfo": "/news",
  "remoteAddr": "127.0.0.1",
  "referer": "http://www.mydomain.com/",
  "timestamp": 1371419505909,
  "collectorData": {
    "geo": {
      "country": "",
      "city": "",
      "latitude": 0,
      "longitude": 0
    },
    "returningvisitor": false,
    "channel": "English Website"
    },
    "personaIdScores": [],
    "globalPersonaIdScores": []
}
The above snippet is taken from the requestlog of our documentation website. As you can see our relevance/targeting module is collecting data about visitors (like geo data, type of channel a user is visiting, etc) and this data is stored in Couchbase as a JSON document.
Now that we have this data inside our database we would like to slice this data and see what our visitors are doing over time.
Elasticsearch
 Elasticsearch is probably one of the most rapidly adopted technologies. It has adoption by companies like Github, StackOverflow and Foursquare. For those of you not yet familiar with Elasticsearch; it’s a distributed (JSON based) document storage solution with advanced query capabilities and often used for distributed search and analytics.
If you already have Elasticsearch installed on your machine you can skip this step, but if you don’t then let’s first start with installing Elasticsearch. For ease of use I’ve written down all the manual command-line steps, so this is easy to reproduce.
$ curl -O https://download.elasticsearch.org/elasticsearch/elasticsearch/elasticsearch-0.90.2.tar.gz
This will download Elasticsearch 0.90.2 to your local directory. Now let’s unzip it and move move on to installing the Couchbase plugin.
$ tar xzvf elasticsearch-0.90.2.tar.gz
Adding the Couchbase transport plugin
Since we’re using the latest version of Elasticsearch we need to manually build the Couchbase transport plugin from Github. This part is a little more tricky, but still quite easy to do. Let’s first do a checkout of the transport plugin from Github.
$ git clone https://github.com/couchbaselabs/elasticsearch-transport-couchbase.git
Since the transport plugin depends on a SNAPSHOT of the couchbase-capi-server module we will need to build that locally as well.
$ git clone https://github.com/couchbaselabs/couchbase-capi-server.git
Now let’s build the capi server first.
$ cd couchbase-capi-server/ && mvn clean install
This installs the dependency into your local maven repository for later usage. Now we need to switch back to the transport plugin directory and we need to create the plugin package:
$ cd ../elasticsearch-transport-couchbase/
$ mvn clean package
Now that both dependencies have been build we can continue to installing the plugin into Elasticsearch. Let’s first switch back to our Elasticsearch install directory.
$ cd ../elasticsearch-0.90.2/
Due to an issue with the elasticsearch 0.90.2 plugin manager we need to install the plugin without the Elasticsearch plugin manager. Let’s first manually create the transport-couchbase plugin directory.
$ mkdir plugins/transport-couchbase
$ cd plugins/transport-couchbase
Next we need to unzip the plugin archive we just created.
$ unzip [/path/to/your/githubcheckout/]elasticsearch-transport-couchbase/target/releases/elasticsearch-transport-couchbase-1.0.1-SNAPSHOT.zip
Now we also need to set a proper username and password for the connection from Couchbase (needed for replication).
$ cd ../../
$ echo "couchbase.password: password" >> config/elasticsearch.yml
$ echo "couchbase.username: Administrator" >> config/elasticsearch.yml
Now that everything is in place we can fire up elasticsearch.
<pre class="brush: bash; gutter: false;">$ ./bin/elasticsearch -f
</pre>During startup you should see something similar to:
<pre class="brush: plain; gutter: false;">[2013-07-22 10:57:43,940][INFO ][transport.couchbase] [Toro] bound_address {inet[0.0.0.0/0.0.0.0:9091]}, publish_address {inet[/10.10.100.156:9091]}
</pre>With transport.couchbase in the start up log it means the Couchbase transport plugin started correctly and is running on port 9091 (you will need this later on).
So far for getting the connection up and running. For more information about configuring the transport plugin please read the official documentation.
###Storing data in Elasticsearch
Let’s first create a new index to hold our data.
$ curl -XPUT 'http://localhost:9200/targeting'
If you follow the official Couchbase transport plugin documentation you will also need to import the Couchbase mapping file, so that elasticsearch knows how to index (or not) certain fields. The transport plugin comes with a mapping for Couchbase documents which marks all documents coming from Couchbase to be indexed and not stored within Elasticsearch. This default is there because Couchbase itself is really fast in getting the document and it does not need elasticsearch to store the document. That’s fine for most use cases, but in our case we would like use our data later on to view it in Kibana, so we will need to create our own simple mapping for documents coming from Couchbase.
Now that we have our index created we will need to add the mapping for our document of type couchbaseDocument.
$ curl -XPUT 'http://localhost:9200/targeting/couchbaseDocument/_mapping' -d '{
  "couchbaseDocument": {
      "properties": {
          "doc": {
              "properties": {
                  "timestamp": {
                      "type": "date"
                  },
                  "remoteAddr": {
                      "type": "ip"
                  },
                  "collectorData": {
                      "properties": {
                          "channel": {
                              "type": "string",
                              "index": "not_analyzed"
                          },
                          "audience": {
                              "properties": {
                                  "terms": {
                                      "type": "array"
                                  }
                              }
                          },
                          "categories": {
                              "properties": {
                                  "terms": {
                                      "type": "array"
                                  }
                              }
                          }
                      }
                  }
              }
          }
      }
   }
}'
You should see:
{"ok":true,"acknowledged":true}
The above mapping maps certain fields of our example request log document and tells Elasticsearch how to index those specific fields. With the mapping in place we can go into the Couchbase Admin Console and create a reference to our Elasticsearch cluster. Keep in mind that port 9091 is the port we’ve seen before when starting Elasticsearch with the couchbase-transport plugin.

Next we need to setup replication from Couchbase to Elasticsearch. The target bucket in this case is the Elasticsearch index called ‘targeting’ which we created a few minutes ago.
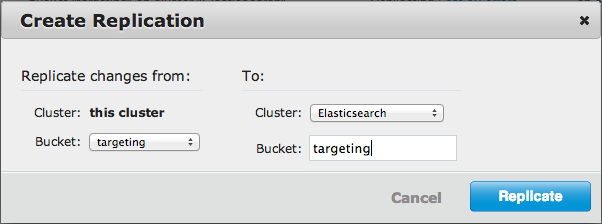
Now when you press replicate Couchbase will start replicating your existing data into the targeting index within Elasticsearch. Now let’s move on to our final step: setting up Kibana 3.
Analytics with Kibana 3
 Kibana 3 is an open source (ASL 2.0) analytics and search interface, which you can use for any kind of timestamped data sets stored in Elasticsearch. It’s really easy to use and gives you a visually attractive representation of the data in graphs, charts and (world)maps. With Kibana you can easily create your own dashboard that represents a nice overview of your dataset.
Kibana 3 is a very easy to install HTML + Javascript application. It only requires a webserver and a connection to Elasticsearch. For more information on how to install Kibana see the introduction page. If you run Elasticsearch on a different port then 9200 you will need to change the config.js file and point it to your Elasticsearch instance. I’ll skip the the installation and move on to showing the data in our own dashboard.
Now when the data is in Elasticsearch you can start adding panels to your dashboard. Adding a pie chart is as easy as couple of clicks. Here is an example of how to add a pie chart panel based on the available channels(sites) within Hippo CMS.

Now when you add a set of panels you might and up with entire dashboard with live streaming data.
One of the nice features of Kibana is that it can load a dashboard configuration from GitHub by using a gist URL. A dashboard I created for Hippo targeting data can be found at: https://gist.github.com/jreijn/5830593
It’s is a nice example of a dashboard and it’s based on request log information of our online documentation website.

Well that’s it. In this post we’ve seen how to setup Couchbase, Elasticsearch and Kibana to perform real-time visitor analysis for your website / web application. Last month at the Hippo GetTogether 2013 I gave a live demonstration of what I’ve written here. When the video becomes available I’ll do a short update or new post, so you can hear more about our relevance module and the integration with Couchbase.