Docker. Who hasn’t heard about Docker by now? Docker might be the biggest change in how operations and developers run and develop software. As I’m all for improving my own flow of work, I too took the plunge into the Docker ecosystem.
To challenge myself beyond the normal “Hello world”, which you can find all over the internet, I wanted to try and mimic a more realistic situation. Docker Compose should make this really simple and easy to do. The central container image repository, Docker Hub, contains a huge amount of ready to use container images. Container images for many well-known applications and operating systems (Ubuntu, MySQL, NodeJS, Nginx, etc) are available inside Docker Hub, but you can also easily create your own container image(s). In this post, we’ll use some existing container images and create our own for our custom application.
The project
The idea I had was simple. In my day to day job at Hippo (CMS) I mostly work with a stateless framework, so what I wanted to do was build a small demo application with a login that used session replication, so that the user would stay logged in even if one of the containers would be dropped or scaled down.
Before we continue, I assume you have installed docker, docker-compose and have created a VM with docker-machine or boot2docker. I case you have not I would suggest to first follow the Docker Getting started guide.
The application
For the application, I chose to use Spring Boot. Spring Boot makes it easy to create stand-alone, production-grade Spring based applications. It’s as easy as it sounds. Spring Boot heavily depends on convention over configuration and allows you to get started quickly. The project was going to be a web project and it needed 3 different pages:
- a homepage
- a login page
- a welcome ‘user’ page (after the login)
By using Spring Security and whitelisting only request to “/” and “/home”, all other pages are behind a login by default. The code snippet below shows how to do this.
@Configuration
@EnableWebMvcSecurity
public class WebSecurityConfig extends WebSecurityConfigurerAdapter {

    @Override
    protected void configure(HttpSecurity http) throws Exception {
        http
                .authorizeRequests()
                .antMatchers("/", "/home", "/favicon.ico", "/css/**", "/webjars/**").permitAll()
                .anyRequest().authenticated()
                .and()
                .formLogin()
                .loginPage("/login")
                .permitAll()
                .and()
                .logout()
                .permitAll()
                .logoutSuccessUrl("/")
                .and().rememberMe();
    }

    @Autowired
    public void configureGlobal(AuthenticationManagerBuilder auth) throws Exception {
        auth
                .inMemoryAuthentication()
                .withUser("user").password("password").roles("USER");
    }
}
For storing user credentials we use a simple user account in an in-memory authentication store, that’s fine for demo purposes. There is some more code for this project, but in this post I’ll just highlight the most relevant code. The entire project can be found on GitHub.
Handling session based logins
Now that we have our user store available, let’s move on to handling the HTTP sessions used for maintaining the logged in state of users. There are several approaches to this problem, either use an application container specific handling of sessions or use Spring Session. For this application I went with Spring Session because it has two interesting aspects that do exactly what I need:
- Spring Session makes it easy to replace the HttpSession in an application container (i.e. Tomcat) neutral way
- Spring Session makes it trivial to support clustered sessions without being tied to an application container specific solution.
Configuring Spring session is pretty straight-forward. All you need to do is create an HttpSessionConfig object and set the correct Spring annotation.
@Configuration
@EnableRedisHttpSession
public class HttpSessionConfig {

    @Bean
    public JedisConnectionFactory connectionFactory() {
        JedisConnectionFactory connection = new JedisConnectionFactory();
        connection.setHostName("redis");
        return connection;
    }
}
Spring Session has default support for Redis, which is perfect for storing HTTP Session information. To use redis for session storage you will need to add the @EnableRedisHttpSession annotation and configure the connectionFactory.
Now in order for the HttpSessionConfig to be used we need to initialize it together with our Spring security configuration.
public class SecurityInitializer extends
        AbstractSecurityWebApplicationInitializer {

        public SecurityInitializer() {
                super(WebSecurityConfig.class, HttpSessionConfig.class);
        }
}
For more in-dept installation instructions follow the Spring Session reference manual.
Now that we’ve implemented the security and session related code, let’s create a package of our application and move on to see how we can containerize it.
mvn clean package
Once Maven is finished we will have an executable jar which can be used to run our application.
Dockerizing the application
To be able to use the application in a container, we need to create a Dockerfile.
A Dockerfile is simple DSL based descriptor file which describes how to package and run the application.
Let’s take a look at the Dockerfile for our application:
FROM java:8
VOLUME /tmp
ADD target/demo-0.0.1-SNAPSHOT.jar app.jar
RUN bash -c 'touch /app.jar'
EXPOSE 8080
ENTRYPOINT ["java","-Djava.security.egd=file:/dev/./urandom","-jar","/app.jar"]
In case you are still new to Docker, let’s go through the Dockerfile.
For our application to be able to run, we’ll be using an existing Java8 image from Docker Hub. It takes care of installing Java and other required dependencies for us.
With the ADD instruction, we copy our application jar to the filesystem of the container.
By using an ENTRYPOINT, we can run the container as an executable.
The EXPOSE instruction informs Docker that the container will listen on the specified network port at runtime, in our case port 8080, because that’s what Spring Boot runs on by default.
The application can now be launched, but before we do so, let’s set up the rest of our infrastructure before we start the containers.
Load balancing
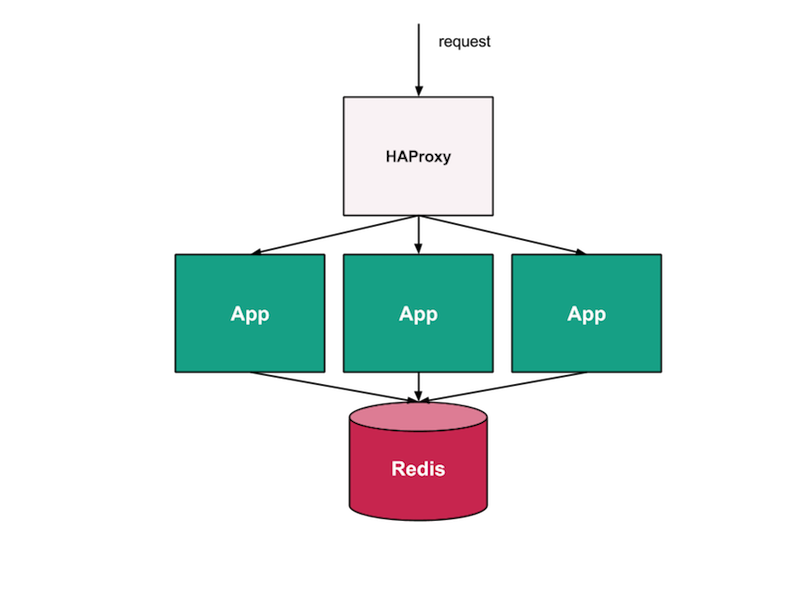
Now that we have everything in place, we need to let requests flow to the application and jump between the available containers, so that we can validate that we are ‘logged in’ on all the application nodes. To do this, we can use HAProxy, a software load balancer.
The guys over at Tutum, The Docker Platform for Dev and Ops, have created a really interesting HAProxy image which we can use for our application with minimal configuration effort. The Tutum HAProxy image balances between linked containers and, if launched in Tutum, reconfigures itself when a linked cluster member redeploys, joins or leaves. Even though we are running this locally, it sounds exactly what we need.
Connecting containers with Docker Compose
Docker Compose, “a tool for defining and running complex applications with Docker”. With Docker Compose, you can define a multi-container application in a single file. Once that’s done, you can spin up the entire setup with a single command.
It’s important to understand that docker compose will run all your containers within the same VM / machine. This is fine for local development, but for a production environment you might want to look at using tools like Apache Mesos or Google Kubernetes architecture to distribute the containers across VMs.
For Docker Compose to understand what needs to happen, it requires a docker-compose.yml descriptor file, which outlines the different applications that make up our overall application architecture. In our specific case, we place the docker-compose.yml file at the level above our application, so that we can let docker-compose also build our application.
spring-session-docker-demo
├── app
│   ├── Dockerfile
│   ├── pom.xml
│   └── src
└── docker-compose.yml
Let’s take a look at the descriptor file.
db:
  image: redis:3.0.3
  hostname: redis
  ports:
    - "6379:6379"
app1:
    build: app
    links:
      - "db:redis"
app2:
    build: app
    links:
      - "db:redis"
app3:
    build: app
    links:
      - "db:redis"
haproxy:
    image: tutum/haproxy:0.2
    ports:
      - "80:80"
      - "1936:1936"
    links:
        - app1
        - app2
        - app3
As you can see we have 3 different types of applications:
- apps (our application)
- haproxy (the load balancer)
- db (our Redis DB)
By using “links”, within the docker-compose file you can link the applications to each other. For ease of use and since we can’t use the auto-discovery feature of Tutums HAProxy, I’ve just defined the app 3 times. An alternative would have been to use docker-compose scale app=3, but that would require us to restart the haproxy container to see if that would work.
To test the final setup we need to tell docker-compose to build the containers:
docker-compose build
This will create docker container image(s) if required. In our case, it will download the redis and haproxy image and build our app image.
Now let’s start the containers:
docker-compose up
If all goes well you should see 3 applications during startup:
db_1
app_1
app_2
app_3
haproxy_1
To figure out if everything is working, we can test this in our local environment. By using docker-machine, we can get the local ip of the vm running the containers. If you’re running an a Mac, like me, the containers are exposed to the (Virtualbox) VM and not to your local machine, therefor we need to get the ip of the VM to actually see HAProxy running on port 80.
docker-machine ip dev
Now that we have the ip all we need to do is open up our browser and see the homepage. Without logging in you should see something like:
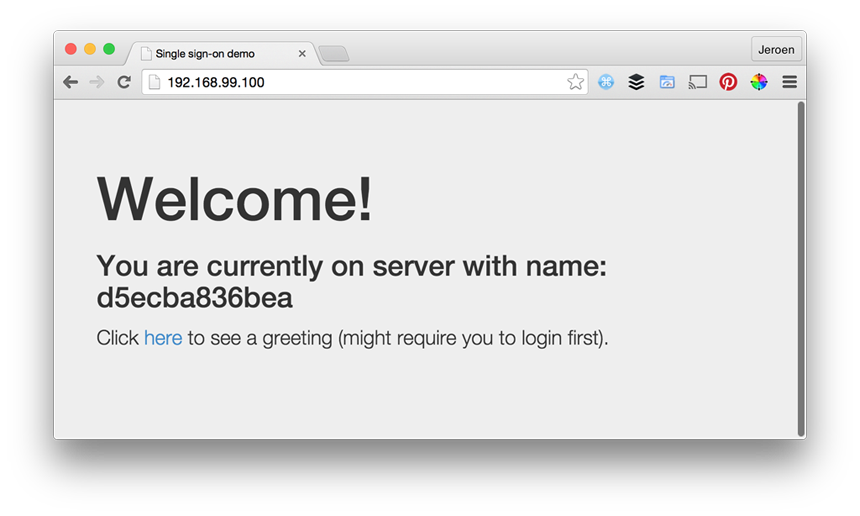
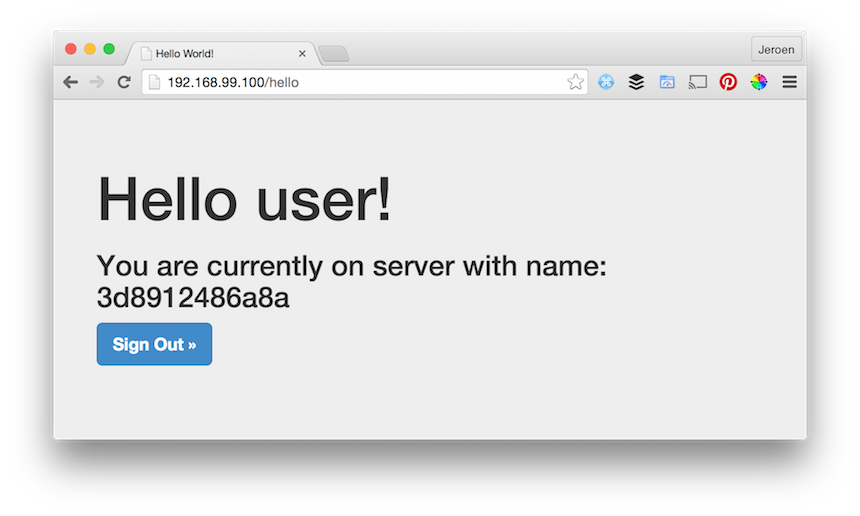
If you would request the URL with curl or an anonymous browser a couple of times, you should see the server/container id shift. After the login we should still see the welcome message, but now also with the username and server id. By refreshing the page a couple of times you will see we shift to the application running on a different container, but are still logged in.
Summary
As you can see it’s pretty straight-forward to test session replication with Docker, Spring Session and Redis. It’s easy to setup the environment with Docker and Docker Compose. The amount of existing container images can drastically reduce the time required to do a proper setup.
For those of you interested in the source code of this project, it can be found on Github.